Cheeseburger Pockets: The Ultimate Guide to This Irresistible Handheld Comfort Food
Cheeseburger Pockets are quickly becoming one of the most loved comfort foods for busy families, food lovers, and anyone who craves the classic flavors of a cheeseburger in a fun, portable form. Combining juicy seasoned beef, melty cheese, and soft baked dough, Cheeseburger Pockets offer everything you love about a traditional burger—without the mess, grill, or bun sliding apart mid-bite.
In this comprehensive guide, we’ll explore everything you need to know about Cheeseburger Pockets. From what makes them special and why they’re so popular, to step-by-step cooking instructions, variations, meal prep tips, and serving ideas—this post is your one-stop resource. Whether you’re new to the recipe or looking to perfect it, Cheeseburger Pockets deserve a permanent spot in your kitchen rotation.
What Are Cheeseburger Pockets?
Cheeseburger Pockets are a baked, enclosed version of a cheeseburger. Instead of serving seasoned beef and cheese inside a sliced bun, the filling is wrapped inside dough—such as biscuit dough or pizza dough—and baked until golden brown. The result is a soft, fluffy exterior with a savory, juicy center that delivers classic cheeseburger flavor in every bite.
Unlike traditional burgers, Cheeseburger Pockets are:
-
Handheld and portable
-
Less messy
-
Easy to customize
-
Perfect for kids and adults alike
They’re often compared to stuffed rolls, savory pastries, or homemade hot pockets—but with the unmistakable flavor profile of a cheeseburger.
Why Cheeseburger Pockets Are So Popular
The rise in popularity of Cheeseburger Pockets isn’t accidental. They check nearly every box when it comes to modern home cooking.
1. Convenience
Cheeseburger Pockets are quick to prepare and easy to serve. No assembling burgers at the table, no dripping sauces, and no need for multiple toppings bowls. Everything is already inside the pocket.
2. Kid-Friendly Appeal
Kids love Cheeseburger Pockets. They’re easy to hold, fun to eat, and familiar in flavor. Parents love them because picky eaters are far more likely to finish a Cheeseburger Pocket than a traditional burger.
3. Versatility
You can serve Cheeseburger Pockets for:
-
Weeknight dinners
-
School lunches
-
Game day snacks
-
Parties and gatherings
-
Meal prep and freezer meals
Few recipes are this adaptable.
4. Customizable Flavors
From classic cheeseburger style to spicy, smoky, or even breakfast-inspired versions, Cheeseburger Pockets can be endlessly customized.
Cheeseburger Pockets Recipe Details
Before diving deeper, let’s look at the core recipe that forms the foundation of this dish.
Servings: 6 pockets
Prep Time: 15 minutes
Cook Time: 18–20 minutes
Total Time: About 35 minutes
Difficulty: Beginner
This recipe is designed to be approachable even for novice cooks, yet satisfying enough for experienced home chefs.
Ingredients for Cheeseburger Pockets
One of the best things about Cheeseburger Pockets is that they use simple, everyday ingredients.
Main Ingredients
-
1 lb ground beef
-
1 tsp salt
-
½ tsp black pepper
-
½ tsp garlic powder
-
½ tsp onion powder
-
1 cup shredded cheddar cheese (or American cheese)
-
1 can refrigerated biscuit dough or pizza dough
Optional Flavor Boosters
-
2 tbsp ketchup
-
1 tbsp yellow mustard
-
1 tbsp diced pickles
For Baking
-
1 egg, beaten (egg wash)
-
Sesame seeds (optional)
Each ingredient plays a role in recreating that classic cheeseburger taste inside a soft baked pocket.
Step-by-Step Instructions for Cheeseburger Pockets
Step 1: Preheat the Oven
Preheat your oven to 375°F (190°C). Line a baking sheet with parchment paper to prevent sticking and make cleanup easier.
Step 2: Cook the Beef
In a skillet over medium heat, cook the ground beef until fully browned. Break it apart as it cooks for even texture. Drain any excess fat, then season with salt, black pepper, garlic powder, and onion powder. Remove from heat and allow it to cool slightly.
Step 3: Prepare the Dough
Separate the biscuit dough or roll out pizza dough and divide it into equal portions. Flatten each piece into a 4–5 inch circle. Make sure the dough isn’t too thin, or it may tear when sealing.
Step 4: Fill the Cheeseburger Pockets
Spoon cooked beef into the center of each dough round. Top with shredded cheese, ketchup, mustard, and diced pickles if desired. Avoid overfilling to ensure a proper seal.
Step 5: Seal the Pockets
Fold the dough over the filling to create a half-moon or pouch shape. Pinch the edges tightly to seal completely. Any gaps can cause cheese to leak during baking.
Step 6: Bake
Place the sealed Cheeseburger Pockets seam-side down on the baking sheet. Brush the tops with beaten egg and sprinkle with sesame seeds if using.
Bake for 18–20 minutes, or until golden brown and puffed.
Step 7: Cool and Serve
Let the Cheeseburger Pockets cool for a few minutes before serving. The filling will be very hot straight out of the oven.
Flavor Variations for Cheeseburger Pockets
One of the biggest reasons Cheeseburger Pockets stay exciting is how easy they are to customize.
Classic Cheeseburger Pockets
Stick with beef, cheddar cheese, ketchup, mustard, and pickles for a true burger experience.
Extra Cheesy Cheeseburger Pockets
Add cheese both under and over the beef, or mix cream cheese into the filling for an ultra-creamy texture.
Bacon Cheeseburger Pockets
Mix cooked, crumbled bacon into the beef before filling the dough.
Spicy Cheeseburger Pockets
Add diced jalapeños, pepper jack cheese, or a splash of hot sauce.
BBQ Cheeseburger Pockets
Swap ketchup and mustard for barbecue sauce and use smoked cheddar or gouda.
Healthier Cheeseburger Pockets
Use ground turkey or lean ground beef and whole-wheat dough.
Tips for Perfect Cheeseburger Pockets Every Time
-
Don’t overfill: Too much filling makes sealing difficult.
-
Seal tightly: Pinch edges firmly or use a fork to crimp.
-
Cool the beef slightly: Hot filling can weaken the dough.
-
Use parchment paper: Prevents sticking and helps browning.
-
Let them rest: Cooling helps the filling set inside.
Meal Prep and Freezer-Friendly Cheeseburger Pockets
Cheeseburger Pockets are excellent for meal prep.
Freezing Instructions
-
Assemble the pockets but do not bake.
-
Place them on a baking sheet and freeze until solid.
-
Transfer to freezer bags or airtight containers.
Baking from Frozen
Bake directly from frozen at 375°F, adding 5–7 extra minutes to the cooking time.
This makes Cheeseburger Pockets perfect for busy nights when you need dinner fast.
Serving Ideas for Cheeseburger Pockets
Cheeseburger Pockets are satisfying on their own, but pairing them with sides makes a complete meal.
Side Dish Ideas
-
French fries or sweet potato fries
-
Coleslaw
-
Side salad
-
Roasted vegetables
-
Onion rings
Dipping Sauces
-
Ketchup
-
Burger sauce
-
Ranch dressing
-
Honey mustard
-
Spicy mayo
Cheeseburger Pockets: The Ultimate Guide to This Irresistible Handheld Comfort Food
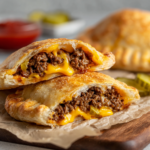
Cheeseburger Pockets are a fun, handheld twist on the classic cheeseburger. Juicy seasoned beef and melted cheese are tucked inside soft dough and baked until golden and irresistible. Perfect for weeknight dinners, kids’ lunches, game days, or meal prep—these pockets deliver big burger flavor in every bite.
Ingredients
-
1 lb ground beef
-
1 tsp salt
-
½ tsp black pepper
-
½ tsp garlic powder
-
½ tsp onion powder
-
1 cup shredded cheddar cheese (or American cheese)
-
1 can refrigerated biscuit dough or pizza dough
-
2 tbsp ketchup
-
1 tbsp yellow mustard (optional)
-
1 tbsp diced pickles (optional)
-
1 egg, beaten (for egg wash)
-
Sesame seeds (optional, for topping)
Instructions
-
Preheat oven to 375°F (190°C). Line a baking sheet with parchment paper.
-
Cook the beef: In a skillet over medium heat, cook ground beef until browned. Drain excess fat. Season with salt, pepper, garlic powder, and onion powder. Remove from heat.
-
Prepare the dough: Separate biscuit dough or roll pizza dough and cut into equal portions. Flatten each piece into a 4–5 inch circle.
-
Fill the pockets: Add a spoonful of cooked beef to the center of each dough round. Top with cheese, ketchup, mustard, and pickles if using.
-
Seal: Fold dough over filling to form a pocket. Pinch edges tightly to seal.
-
Bake: Place pockets seam-side down on the baking sheet. Brush with egg wash and sprinkle with sesame seeds if desired.
-
Bake for 18–20 minutes, or until golden brown. Let cool slightly before serving.
Notes
-
Extra cheesy: Add cheese both under and over the beef.
-
Burger-style: Mix ketchup and mustard directly into the beef.
-
Healthier swap: Use ground turkey and whole-wheat dough.
-
Freezer-friendly: Freeze unbaked pockets and bake straight from frozen (add 5–7 minutes).
-
Dipping sauces: Serve with ketchup, burger sauce, or ranch.
Nutrition Information (Approximate per Pocket)
-
Calories: 420
-
Protein: 22 g
-
Fat: 24 g
-
Carbohydrates: 28 g
-
Fiber: 2 g
Cheeseburger Pockets are indulgent but filling, making them a satisfying main dish rather than just a snack.
Why Cheeseburger Pockets Work for Any Occasion
Whether you’re feeding a family, hosting friends, or prepping meals for the week, Cheeseburger Pockets adapt beautifully. They feel nostalgic yet modern, simple yet customizable, and indulgent without being complicated.
They’re also a great way to introduce kids to cooking—letting them help fill and seal the pockets makes the process fun and interactive.
Final Thoughts
Cheeseburger Pockets are more than just a recipe—they’re a clever, comforting solution for anyone who loves classic cheeseburgers but wants something easier, cleaner, and more versatile. With simple ingredients, beginner-friendly steps, and endless customization options, Cheeseburger Pockets deserve a spot in every home cook’s recipe collection.
Whether you’re making them for a busy weeknight dinner, packing them for lunch, or serving them at a gathering, Cheeseburger Pockets consistently deliver big flavor in a compact, irresistible form. Once you try them, it’s easy to see why they’ve become a favorite comfort food for all ages.